The retro AI photo boom is here—and it’s easier than it looks
You’ve probably spotted them in your feed this year: moody, grainy portraits that look like they were plucked from a 90s film set. They’re not shot on film. They’re AI stylizations built from everyday photos, and the tool behind a lot of them is Google Gemini. With a single reference image and a clear prompt, you can produce a vintage-style portrait that feels cinematic without touching a DSLR or studio lights.
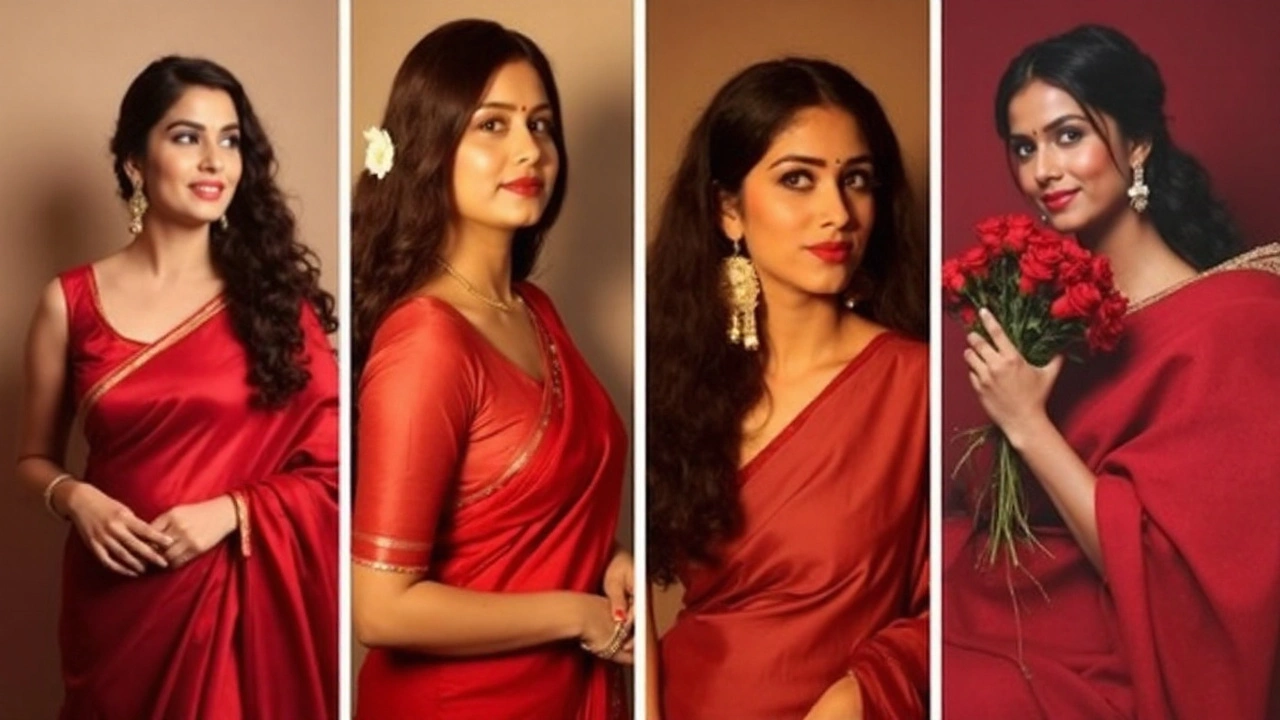
Why does this look click? It’s familiar yet fresh. Retro textures, soft contrast, and golden-hour tones flatter skin and add drama. Minimal backgrounds and strong shadows make these portraits feel intentional. In India especially, saree-draped portraits with classic styling—flowers tucked into hair, warm wall backdrops—are everywhere on Instagram Reels and YouTube Shorts.
Gemini’s image tools are built for this kind of task: you describe the look (lighting, mood, outfit, background), upload a reference photo, and ask for variations until it matches your taste. Beyond portraits, creators are using the same workflow to make wallpapers, channel thumbnails, and even pseudo-3D parallax photos for reels. The learning curve is light. The craft is in the prompt.
One quick note before you start. Treat any portrait like you would a real photoshoot: get consent from the subject, avoid uploading private images, and be transparent if you post AI-altered images. Face consistency isn’t guaranteed every time, so patience and iteration help. Some features vary by region and account type, but the core workflow is widely available and, for many users, free to try.
How to create viral retro portraits with Gemini: workflow, prompts, tips, and troubleshooting
Here’s a simple end-to-end flow you can follow on desktop or mobile:
- Open Gemini in your browser and start a new chat.
- Click the plus icon to upload your reference photo. Pick a clear, front-facing image with good detail.
- Write a focused prompt: describe outfit, lighting, mood, background, and framing. Ask Gemini to keep the same face as the photo.
- Review the first result. If the vibe is right but details are off, ask for small tweaks. If it missed the brief, simplify the prompt and rebuild it step by step.
- Request 2–4 variations. Pick a favorite, then ask to refine color, texture, or shadows.
- Download the final image and crop for your platform (4:5 for Instagram feed, 9:16 for Reels/Shorts).
Use a high-quality reference photo. Avoid blurry selfies or busy backgrounds. A plain wall, even light, and a natural pose work best. If the subject wears glasses or jewelry you want to keep, say so in your prompt.
Now for the fun part—prompt recipes you can adapt. Keep your language simple and direct. Start with a core instruction, then add lighting, mood, and background. If a detail is critical, repeat it once. Here are field-tested structures you can tweak:
- Yellow chiffon saree, 90s retro vibe: “Create a vintage-style portrait using my uploaded photo. Same face as my image. She is draped in a plain yellow chiffon saree, soft fabric, Pinterest-style retro look. 90s movie mood. Dark brown wavy hair with a small fresh flower tucked into the curls. Windy feel in the scene. She stands against a solid wall with deep shadows and strong contrast. Warm golden-hour lighting, sunset glow.”
- Red saree, ultra-realistic, golden hour: “Ultra-realistic retro portrait from my photo. Keep the same face. She wears a sheer red saree and a fitted blouse. Long wavy dark hair with a white flower behind her ear. Soft glowing skin, elegant pose holding the drape with one arm. Dramatic light and shadow on the wall, cinematic mood, serene expression. Request high detail.”
- 4K-style, minimalist art wall: “Make a high-detail, realistic portrait from my image. Do not change the face. Minimal warm-toned wall in the background, soft light coming from the right. Show a soft-edged profile shadow on the wall. Add subtle film grain and a gentle vintage color grade. Artistic yet natural.”
- Classic menswear, retro street: “Turn my uploaded photo into a retro 90s street portrait. Same face. He wears a white tee, light-wash denim jacket, and black trousers. Golden-hour side light, long shadow on a plain concrete wall. Slight grain, warm tones, and a calm, cinematic mood. Natural skin texture.”
- Monochrome film studio look: “Convert my photo into a black-and-white studio portrait. Keep the same face. Soft directional light, smooth gradient background, strong contrast, subtle film grain, no color tint. Clean and timeless.”
Want a reusable template you can fill like a form? Try this pattern:
“Use my uploaded photo as the reference. Keep the same face and expression. Outfit: [describe outfit]. Hair and accessories: [describe hair, flower, earrings, etc.]. Background: [solid wall/minimal/textured]. Lighting: [golden hour/sunset/sidelight/soft studio]. Mood: [cinematic/serene/mysterious/artistic]. Add [subtle film grain]. Emphasize [shadows/contrast/skin texture]. Avoid [changing the face/over-smoothing/extra jewelry].”
Small wording changes have big effects. If the face keeps changing, say “use my exact face from the uploaded photo.” If the image gets too glossy, ask for “less retouching and more natural skin texture.” If the colors skew orange, request “warmer light but neutral skin tones.”
Trending styles you can name-check in prompts:
- Retro film grain with warm color grade
- 90s cinema composition and gentle lens flare
- Golden-hour side lighting with strong wall shadows
- Saree portraits with minimalist backdrops
- Pinterest-style framing and negative space
Precision matters. Here are technical tips that consistently improve results:
- Face consistency: Tell Gemini to “use the same face as the uploaded photo.” If it drifts, try a closer-cropped reference or restate “do not alter identity.”
- Lighting: Be specific—“warm sunset side light,” “soft studio key from the right,” or “overcast window light.” Ask for a “soft-edged shadow on the wall” if you want depth.
- Quality: If you need high detail, ask for “high detail, natural texture, fine hair strands.” Over-asking for ultra resolution can push it into plastic skin; balance is key.
- Mood: Declare it plainly—“cinematic,” “serene,” “mysterious,” or “artistic.” Add “subtle film grain” for that retro finish.
- Background: “Solid wall,” “minimal warm-toned wall,” or “slightly textured plaster.” Simple backdrops help faces pop.
- Camera sense: Mention “portrait framing, slight headroom, shallow depth of field” to shape composition without technical jargon.
- Color control: If reds oversaturate, ask for “rich reds, controlled highlights, neutral skin tones.”
- Clothing and drape: For sarees, specify fabric (chiffon, georgette, cotton), drape style (classic, neat pleats), and how the pallu sits.
- Hair and accessories: Call out hair shape, parting, curls, and accessories. If you want flowers, say which side of the head and the flower color.
If you want to turn your still image into video, the workflow is simple:
- Generate a clean base portrait in Gemini.
- Export at the largest size you’re offered. Keep a PNG or high-quality JPEG.
- Add motion in a video or photo app that supports parallax, 3D photo tilt, or slow pan-and-zoom (Ken Burns). Keep moves gentle so it still feels like a portrait.
- Color-match your video to the still: same warmth, contrast, and grain.
- Export for vertical platforms: 9:16 (1080×1920) for Reels/Shorts, 4:5 (1080×1350) for feed posts. Use a bitrate that keeps hair detail clean.
How are creators using these? Before/after reels (“plain selfie to retro portrait”) pick up strong engagement. Thumbnails with a warm wall, a single flower in hair, and sharp shadow lines stand out on YouTube. For brand or creator pages, a consistent look—same background color, similar lighting—helps the grid feel cohesive.
Saving and sharing tips:
- Download the highest-quality version Gemini provides.
- Crop per platform so faces don’t get cut off by UI overlays.
- Avoid over-compressing; watch for hair and fabric artifacts.
- Keep an original and an edited copy so you can revisit color later.
- Consider adding a caption note that the image is AI-stylized, especially for portraits of real people.
Accessibility and cost: The core image generation features are available to many users for free. Availability and output limits can vary by region, account, and product updates. If you don’t see an option you’ve seen in a tutorial, try the desktop browser version, sign in, or check for product updates.
When results go sideways, here’s how to recover:
- Face looks different: Re-upload a sharper, closer reference. Say “use the exact face from my photo, do not change identity or age.” Reduce adjectives that can push it off-model.
- Hands or jewelry look odd: Specify “simple hand pose” or “no extra rings or bracelets.” Busy details are where models stumble.
- Colors are too intense: Ask for “muted warm palette, neutral skin, controlled highlights.”
- Skin looks plastic: Request “natural skin pores, minimal retouching, lower smoothing.”
- Background gets busy: Lock it down—“solid warm wall, no textures or patterns,” or “minimal studio backdrop.”
- Too many changes at once: Split the job. First get lighting and background right. Then lock the face. Finally dial in clothing and accessories.
If you want to push quality further, try this two-pass approach:
- Pass 1—Composition and mood: “Same face, minimal warm wall, golden-hour side light, subtle grain, cinematic mood.” Approve a frame you like.
- Pass 2—Detailing: “Keep the same frame and face. Add fine hair detail, clean pleats on the saree drape, gentle highlight on cheekbone, controlled contrast.”
A few extra prompt tricks that help:
- Reinforce the anchor: Repeat “use my exact face” once more at the end.
- Specify shadow behavior: “Soft-edged shadow on the wall, not harsh.”
- Control accessories: “One white flower behind the right ear, no extra jewelry.”
- Direct the pose: “Standing, shoulder turned slightly, calm expression, eye-line slightly to the right.”
- Keep language clean: Avoid contradictions like “super soft shadow” and “high contrast” together; pick one.
Ethics and etiquette matter with portraits. Get consent from anyone featured. Don’t upload minors’ photos without a guardian’s permission. Avoid misleading edits that could harm reputations. If you’re working with cultural attire like sarees, present it respectfully—neat drape, appropriate styling, and context matter. If a client or follower asks whether an image is AI-stylized, be straight about it.
Want a fast-start checklist you can save?
- Pick a sharp, front-facing reference photo against a simple background.
- Write a short prompt: outfit, lighting, mood, background, framing. Add “use my exact face.”
- Generate, then iterate with small, clear fixes.
- Ask for 2–4 variations; choose a favorite and refine color/texture/shadows.
- Export big, crop for platform (4:5 or 9:16), and keep quality high.
- Credit your subject and label AI where it matters.
If you’re aiming for a signature look on social media, settle on a handful of prompt presets—one golden-hour wall, one monochrome studio, one outdoor overcast—and reuse them. Consistency beats novelty when you’re building a visual brand. The retro look works because it’s simple: warm light, clean background, flattering texture. Nail those three, and your portraits will feel timeless rather than trendy.